Do you want your website to be approved by Google AdSense so you can put ads on your website and start to make money? Well, if that’s the case, you’re at the right place. My brand-new website, with just one blog post and a few pages, was accepted within five days by applying the principles I will teach you in this tutorial. Even if your website has been rejected before, it doesn’t mean that your website will be rejected forever.
Google wants to make money. So, if they can make money from your website, they want to do that. But you need to comply with all the terms. I will show you the easy method to get Google AdSense approval. You may have already taken a few steps.
01. Create Enough Content
Contents
- 1 01. Create Enough Content
- 2 02. Create Unique Content
- 3 03. Attract Real Visitors
- 4 04. Quality Content
- 5 05. Intuitive Navigation
- 6 06. Get Privacy Ready
- 7 07. Link Your Website
- 8 08. Get GDPR Compliant
- 9 09. Upload the ads.txt File
- 10 10. Publish Your Seller Information
- 11 Get Ready For Payments
- 12 Conclusion
The first term is that you need to have content on your website. Having a homepage telling that the website is under construction is a no-go. Or having pages and posts with dummy content or empty pages will probably lead to rejection. I created one blog post with two thousand plus words length which is really good. All my other pages were filled with content—not much, just a little bit, but all available content. Create quality and unique content that is useful and helpful for the visitor.
02. Create Unique Content
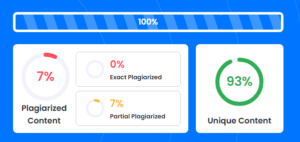
Creating unique content, made by yourself and definitely not copied from another website, is essential. It took me a few hours to create the content for my websites. If you don’t have original content, you probably also do not have a lot of visitors. Placing ads on your website will not make you a lot of money. So, focus on creating a lot of original, high-quality content before you apply for a Google AdSense account.
03. Attract Real Visitors
The next step is to engage visitors to your website and read your content. There are good ways and bad ways. Good ways include sharing your website URL on Facebook, Instagram, LinkedIn, WhatsApp, or any social media platform. Usually, sharing your links will get you a lot of visitors, and they will browse through your website, which is perfectly fine. Do not buy views, use bots, or employ illegal ways to get fake visitors to your website. Google is not crazy; they will see that and will reject your website. Just focus on giving valuable content to your visitors. Do not try to boost your website using weird tricks—just focus on creating quality content.
04. Quality Content
What is good quality content? It is content that is unique to the visitor and adds value to them. It is better to have a few really big blog posts with high-quality content than a website full of pages with low-quality content. I’m not a native English speaker; I’m from the Netherlands. I speak Dutch and have learned to speak English, but it’s not perfect. So, when I write blog posts, I use Grammarly, a great tool that helps me look at the grammar and make my blog posts better. Good quality is important for Google ads—you don’t want a lot of errors or typos because Google does not like that. I have a tutorial about Grammarly, which you can also watch to learn how to write better blog posts.
If you have text about a certain subject, do not copy it and use it in a different blog post just to fill your website with content. Google does not like that. But it’s okay to link to other blog posts on your website, which is called internal linking and is good for SEO. Do not publish any adult or violent content or teach people how to create dangerous stuff because you will get rejected for that. Ensure your high-quality content is easy to navigate.
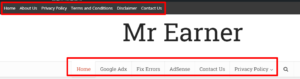
Make sure it is easy to navigate the content on your website. This is something Google teams and crawlers see on your site. A few things to keep in mind: make sure your navigation bar appears in the same place on all devices. For example, if it’s at the top on a desktop, do not place it at the bottom on a smartphone. Ensure your menu is intuitive and that when people go to a certain page, they actually go to the correct place.
06. Get Privacy Ready
You need to have a privacy policy page on your website that states you have ads on your website and will make money from them. I will show you in this tutorial how to do that. Those are the six key points. There are more points, but I will talk you through them as we go. Follow these steps before applying for Google AdSense approval.
07. Link Your Website
The first thing we need to do is go to adsense.google.com and hit enter. Click on Get Started. What you need is a Gmail account. If you don’t have one, set it up—it’s free, just as Google AdSense is free. I already have a Gmail account that is not connected at all with AdSense, so I will start from scratch and use my website to create an AdSense account. Click on the account you want to use and fill in your website. If you don’t have a website yet, you can learn how to make one by searching on YouTube. My website is HTTPS. Do you want to get help? No, thank you. Your payment country/territory—I’m from the Netherlands. Read the Terms and Conditions carefully; you need to be at least 18 to sign up. Never violate these terms; your account will be shut down, and you will not get your money. Never click on your own advertisements or ask others to do so. Do not use AdSense on websites with adult content or copyrighted material. Do not create a second AdSense account if you already have one. Read and agree to the terms.
08. Get GDPR Compliant
Make sure you comply with privacy regulations like GDPR and CCPA before showing ads. Add a GDPR cookie consent plugin to your website and enable it. Ensure your privacy policy includes all necessary information. Edit your privacy policy page and paste the generated content.
09. Upload the ads.txt File
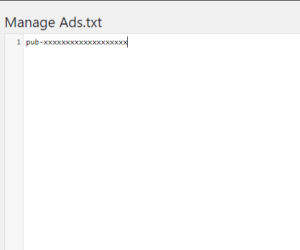
To prevent severe impact on revenue, download the ads.txt file from Google AdSense and upload it to the root level domain of each site you use with AdSense. Go to your website’s root directory and upload the file. Verify that the file is accessible.
10. Publish Your Seller Information
Change your seller information visibility from confidential to transparent in your AdSense account settings. Enter your business domain without HTTPS, slashes, or www. Save your changes.
Get Ready For Payments
Verify your billing address when prompted by Google AdSense. Google will mail a PIN to your address, which you need to enter in your AdSense account. It may take two to four weeks to receive the PIN. Once your address is verified, your payments will be processed.
Conclusion
I hope through these steps, your website will be approved by Google AdSense. Focus on creating valuable, unique content, and you will be successful. If you have any issues, search for the Google AdSense series on YouTube for more guidance. Good luck with your online money-making journey, and remember to help others with quality content on your website.